PHASE 03
Acrylic Techniques
Color, layering and brush techniques
For enrolled students · what you'll actually do
24 exercises
24 exercises — tap any one to see what to do, what you learn, and what success looks like.
Acrylic dries fast, and at first that feels like pressure — you can smell the sharp mineral tang of wet paint, hear the tap of the brush on the water jar. But you learn to trust the rhythm: layering, waiting, building. By the third piece, you stop fighting the brush and start letting it carry the colour where it wants to go, the canvas still tacky-warm under your fingertips.
What this phase builds
Focus & the tools you'll meet
Focus areas
- 01
Colour mixing discipline — limited palette, value before hue
- 02
Brushwork variety — flat, round, filbert, fan; dry-brush and scumble
- 03
Layering & glazing with fast-drying acrylics; building opacity vs transparency
Tools you'll meet
- Acrylic paints: primary set plus titanium white, burnt umber, payne's grey
- Synthetic brushes — flat 1", round 8, filbert 6, fan — each a different voice
- Palette knife — for impasto and mixing clean colour
- Acrylic paper / canvas pad, 300 gsm — survives layering and scrubbing
- Water jars, misting spray, stay-wet palette — keep acrylics workable
At a glance · shareable
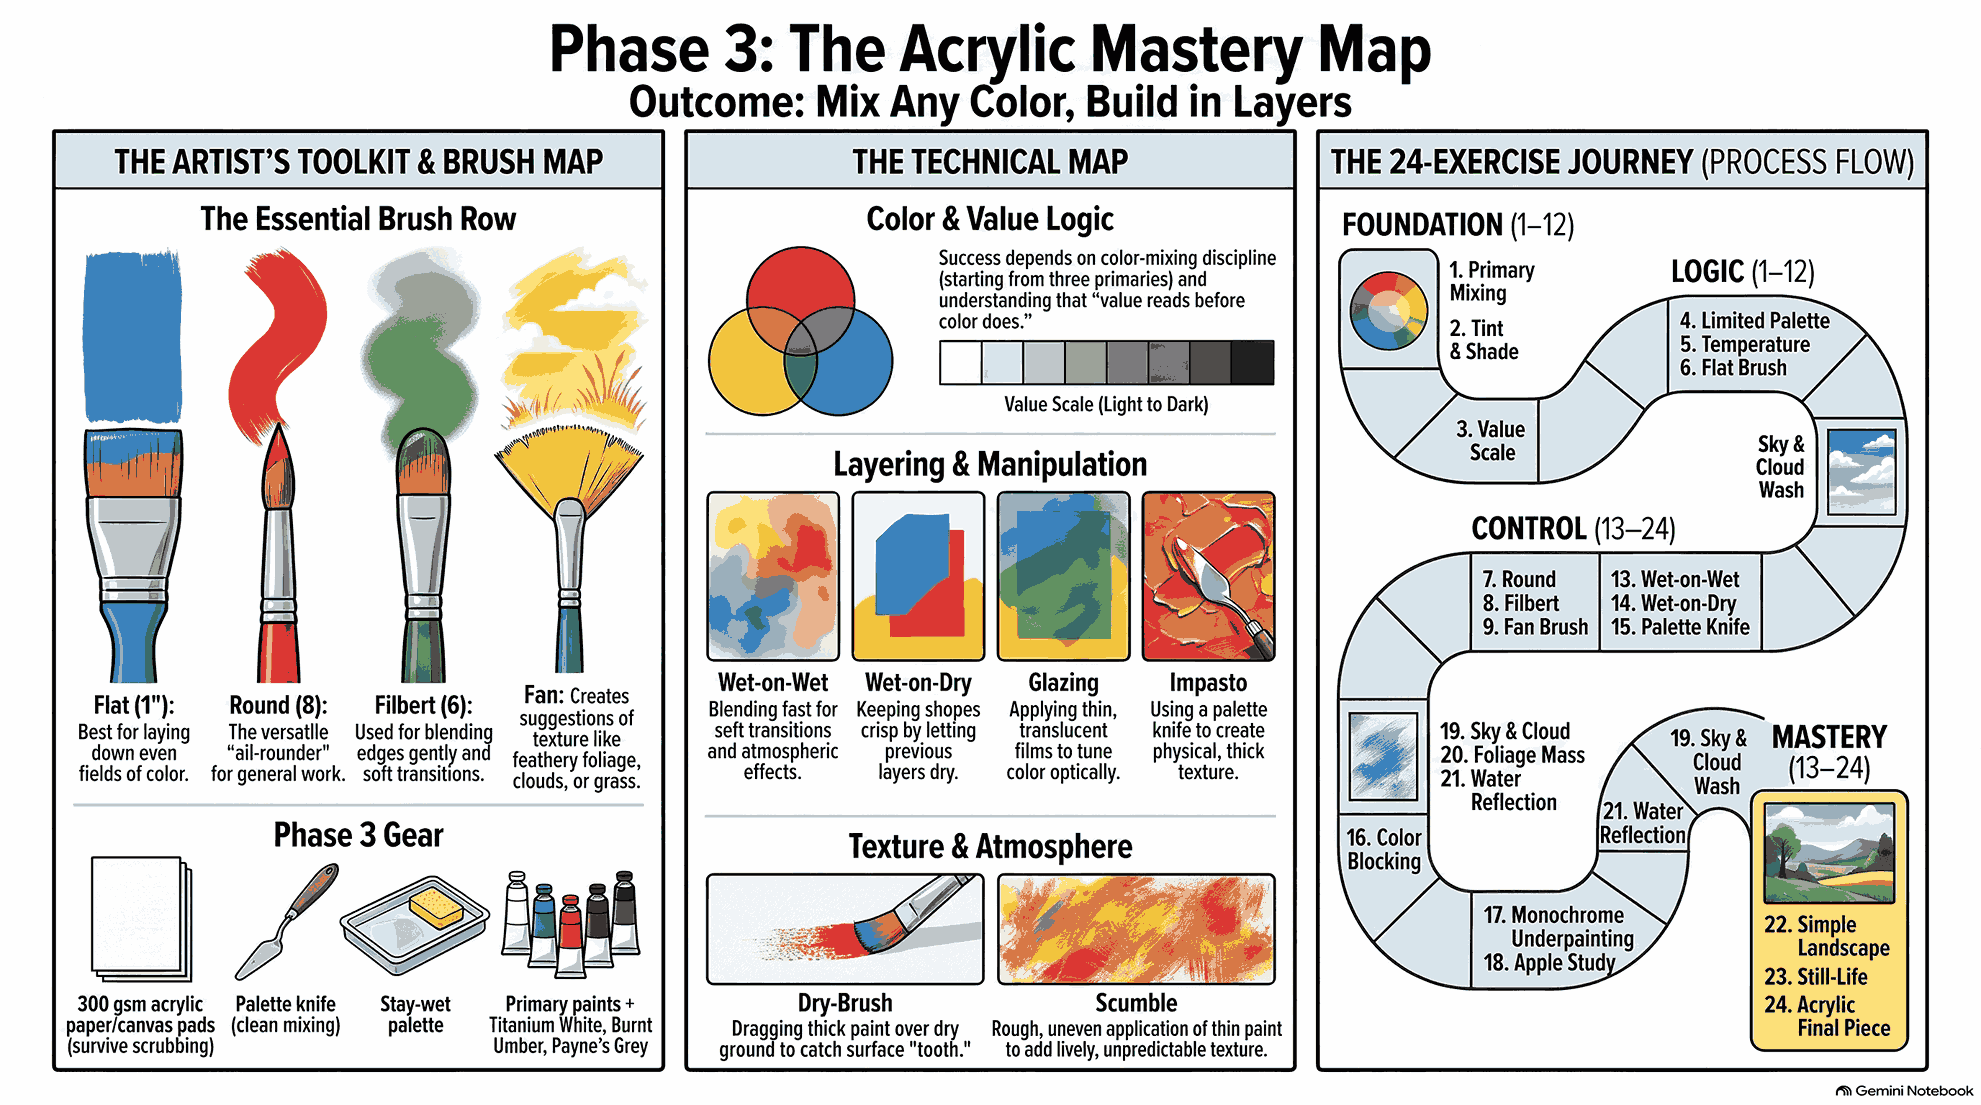
Phase infographic
A one-page visual cheat-sheet of the tools, focus, and practice in this phase.
For class · print
Slide deck
A printable exercise & tool deck — handy in the studio or to email home.
Open PDF ↗Download PDF ↓For students
Study guide for this phase
Key concepts, a short quiz, essay questions, and a glossary for the acrylic batch.
Dear Student
This Study Guide is designed for students and parents of the Meenakshi Art Work academy to navigate the Phase 3 module. This seven-week stage focuses on transitioning from graphite to colour, mastering the fast-drying nature of acrylics, and developing professional brush and layering techniques through 24 structured exercises and the analysis of 42 student examples.
Key concepts
In Phase 3, students move from the grey tones of pencil into the vibrant, fast-paced world of acrylics. We begin with a limited palette — using only a split-primary system and a few neutrals — to enforce colour mixing discipline. Our core mantra is value-before-hue: because value (lightness or darkness) reads before colour does, a painting with a solid value scaffold will always look more realistic than one with correct colours but broken light structures. We use monochrome underpaintings in burnt umber or Payne's grey to map these values before applying local colour. To manage the medium's speed, we use a stay-wet setup, a hydration system that keeps paint workable for hours.
Students learn to use the four brush voices: the flat brush for structural bands, the round brush for controlled detail, the filbert for organic blending, and the fan brush for suggesting textures like grass or clouds. Application styles vary from wet-on-wet for fast gradients to wet-on-dry for crisp, layered shapes. We add atmospheric effects through scumbling (dragging light paint over dark) and glazing (pooling transparent dark paint over light). For physical texture, the palette knife allows for impasto marks and clean mixing, while colour blocking helps students establish large masses before focusing on fine details. Finally, colour temperature is introduced as the primary tool for creating the sensation of natural daylight through shifting warm and cool tones.
Short-answer quiz
Why start every colour from three primaries?
Mixing from three primaries builds colour discipline and harmony, ensuring every shade remains clean and unified.
What does a glaze do?
A transparent glaze tunes colour optically while staying luminous, letting the underpainting shine through like a stained glass window.
Why must acrylics blend fast?
Acrylics dry fast, so you must commit quickly and paint with a relaxed, fast wrist.
What does scumble add?
A scumble adds soft, airy atmosphere without turning muddy by catching on the high ridges of dry paint.
Why use a limited palette for portraits?
Restricting the palette to specific primaries forces colour harmony and prevents the "colour chaos" that comes from using too many unmixed pigments.
What does a monochrome underpainting provide?
It acts as a foolproof value scaffold that establishes all light and shadow patterns before any local colour is introduced.
Why use a stay-wet palette setup?
This setup continuously hydrates the paint from beneath, keeping fast-drying acrylics workable for hours or even days.
What does the filbert brush achieve?
Its curved bristle tips blend paint edges gently, making it the perfect tool for organic forms and seamless transitions.
Why perform a temperature shift in a study?
Shifting temperature models three-dimensional form by creating the sensation of natural daylight through warm highlights and cool shadows.
What does dry-brushing describe?
Dragging concentrated paint over dry canvas creates a scratchy mark ideal for describing textures like wood grain, stone, or fur.
Why is colour blocking an early step?
Blocking allows the student to establish big masses of colour and value before moving into the complexity of smaller details.
What does the palette knife prevent?
Using a palette knife to mix colour prevents the "mud" that occurs when dirty brushes mix paint together.
Essay questions
Why build value before colour?
A good answer covers: value reads before colour does, and establishing a monochrome underpainting or value plan saves you from colour chaos.
How does brush choice change the mark?
A good answer covers: the flat brush for even fields, the round as an all-rounder detail tool, the filbert for soft organic edges, and the fan brush to suggest natural textures.
Wet-on-wet vs wet-on-dry — when to use each?
A good answer covers: using wet-on-wet to blend gradients quickly before drying, and using wet-on-dry to build clean layers, glazes, or crisp shapes.
Why does the studio keep a stay-wet palette?
A good answer covers: keeping fast-drying acrylics workable for hours, avoiding paint waste, and allowing a deliberate rhythm of layering and waiting.
Glossary
- Primary
- The three foundational colours (red, blue, yellow) from which all other colours are derived.
- Secondary
- A colour made by mixing two primary colours.
- Tint
- A lighter version of a colour created by adding titanium white.
- Shade
- A darker version of a colour created by adding black or a dark neutral like Payne's grey.
- Value scale
- A systematic range of tones from light to dark used to establish structure in a painting.
- Limited palette
- A restricted selection of colours used to ensure harmony and force mixing discipline.
- Colour temperature
- The relative warmth or coolness of a colour used to model light and volume.
- Flat brush
- A rectangular brush used for broad fields of colour and sharp, structural bands.
- Round brush
- A pointed brush that serves as an all-rounder for transitions and controlled detail.
- Filbert brush
- An oval-shaped brush designed for soft organic edges and gentle blending.
- Fan brush
- A spread-out brush used to feather edges or suggest textures like grass and foliage.
- Dry-brush
- A technique using minimal, concentrated paint to create scratchy, textured marks.
- Scumble
- A thin layer of light, opaque paint applied over a dark ground to add atmosphere.
- Glaze
- A thin, transparent layer of dark paint applied over a light ground to tune colour optically.
- Wet-on-wet
- Blending wet paint directly into wet paint on the canvas for fast gradients.
- Wet-on-dry
- Applying fresh paint over a completely dry layer to keep shapes and edges crisp.
- Palette knife
- A flexible tool used for clean colour mixing or applying thick paint.
- Impasto
- A style of painting where paint is applied thickly enough to retain three-dimensional texture.
- Colour blocking
- The process of laying down large, simplified masses of colour before adding detail.
- Monochrome underpainting
- A single-colour tonal map used as a value scaffold for the entire painting.
- Stay-wet palette
- A hydration system using a damp base and permeable membrane to keep acrylics wet.
How mastery is judged
At Meenakshi Art Work, progress is not determined by a calendar but by demonstrated skill. Following the studio's third rule — No Rushing — a phase repeats until it is mastered. In Phase 3, mastery is shown by the student's ability to mix any colour seen in a reference, build a painting in confident, logical layers, and use various brushes to accurately describe texture, edge, and light.
Students often begin the phase feeling that the fast-drying nature of the paint is a source of stress. However, as mastery develops, they undergo a specific acrylic reflection: "fast-drying paint first feels like pressure, then becomes a rhythm of layering and waiting." True progress is identified when a student stops fighting the brush and instead lets it carry the colour where it wants to go. Success is reached when the student no longer fears the speed of the medium but uses it to commit to bold, intentional marks on the canvas.
With warmth,
Meenakshi Art Work
Where you land
What you walk away with
You can mix any colour you see, build a painting in confident layers, and use the brush to describe texture, edge, and light.
Curious about Phase 03?
Every phase is taught in person, one artwork at a time. Message us to ask about batches, timings, or where acrylic techniques might fit in your journey.
Message on WhatsApp →Watch this phase on YouTube →